Astrophotography Tips for Travelers
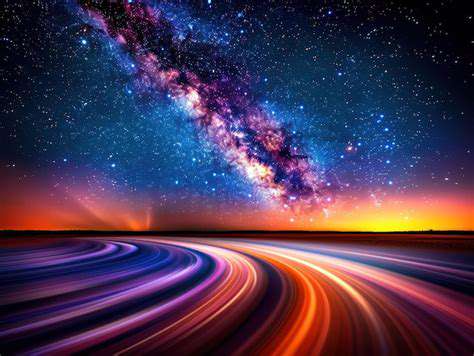
Maximizing Your Exposure Time for Stunning Star Trails and Milky Way Photos
Optimizing Your Camera Settings
To maximize your exposure time, it's crucial to understand the interplay between aperture, shutter speed, and ISO. Adjusting these settings allows you to capture stunning images in low-light conditions or create motion blur effects. Properly balancing these elements is key to achieving the desired outcome, whether you're shooting a fast-moving subject or a serene landscape. This process requires experimentation and a keen eye for detail in your scene.
Begin by adjusting your aperture. A wider aperture (smaller f-number, like f/2.8) allows more light to reach the sensor, potentially enabling faster shutter speeds. Conversely, a narrower aperture (larger f-number, like f/16) restricts light, necessitating longer exposure times. Understanding the relationship between aperture and light intake is essential for successful photography.
Mastering Shutter Speed
Shutter speed directly controls the duration the camera's sensor is exposed to light. A faster shutter speed (like 1/1000th of a second) freezes motion, capturing sharp images of fast-moving objects. Conversely, a slower shutter speed (like 1/15th of a second or even longer) can create motion blur, suitable for capturing the sense of movement in flowing water or a bustling street scene. Understanding the effect of shutter speed on motion is fundamental to creative photography.
Understanding ISO Sensitivity
ISO measures the sensor's sensitivity to light. Higher ISO values (like ISO 3200 or 6400) allow you to shoot in darker environments without compromising shutter speed, but they can also introduce digital noise, which appears as graininess in the image. Lower ISO values (like ISO 100 or 200) are ideal for well-lit conditions, ensuring cleaner images with minimal noise. Careful consideration of ISO is critical for achieving optimal image quality.
Utilizing Natural Light Sources
Natural light is a photographer's best friend. Understanding the quality and direction of natural light can significantly impact your exposure time. Soft, diffused light often requires shorter exposure times, while harsh, direct sunlight might necessitate longer exposures to avoid overexposure. Learning to anticipate and utilize natural light sources is a key skill for any photographer.
Employing Filters and Accessories
Filters and accessories can drastically alter exposure time. Neutral density (ND) filters, for instance, reduce the amount of light reaching the sensor, allowing you to use slower shutter speeds for creative effects like silky smooth water or star trails. Using filters can be a game-changer for achieving specific artistic looks in your photography. Other accessories, such as tripods, can support your camera, minimizing camera shake and enabling very long exposure times.
Analyzing Your Subject and Scene
Thorough analysis of your subject and scene is crucial. Consider the movement of your subject, the ambient light conditions, and the desired aesthetic you want to achieve. Understanding these factors will guide your settings for the ideal exposure time. If you are capturing a fast-moving car, you will want a much faster shutter speed compared to a still life image.
Experimentation and Practice
Ultimately, maximizing exposure time requires consistent experimentation and practice. Don't be afraid to try different combinations of aperture, shutter speed, and ISO. Analyze your results and adjust your technique accordingly. The more you practice, the more familiar you will become with the interplay of these settings and the better you will be at capturing the specific look you desire. Consistent practice is paramount to mastering exposure time control.
Finding the Perfect Dark Sky Location for Unforgettable Shots
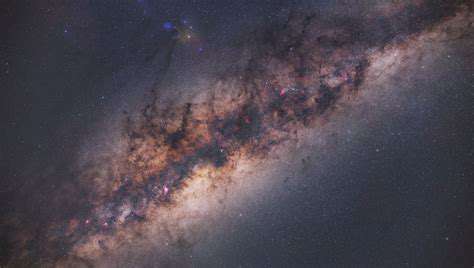
Finding Ideal Dark Sky Conditions
Locating a perfect dark sky site requires careful consideration of several key factors. A crucial element is minimizing light pollution from surrounding areas. This includes both artificial light sources, such as streetlights and building illumination, and natural sources like moonlight. Understanding the local environment, especially the presence of nearby towns and cities, is essential in identifying potential obstructions to a truly dark sky.
Assessing Light Pollution Levels
Tools like light pollution maps can provide valuable insights into the light levels in a given area. These maps often illustrate the intensity and extent of light pollution across a region, enabling you to identify areas with lower levels of light pollution. Utilizing these resources can significantly narrow your search for a location with optimal dark sky conditions.
Furthermore, personal observation can supplement these tools. A visual inspection of the night sky in potential locations will reveal the actual darkness level, which might differ from the predicted levels on a map.
Considering Geographic Factors
Geographical factors play a significant role in determining the quality of a dark sky location. Mountains and hills can act as natural barriers, shielding the area from light pollution emitted from surrounding urban areas. Similarly, elevation can be a contributing factor as higher altitudes often experience less light pollution. These geographical advantages can dramatically improve the visibility of celestial objects, creating a truly awe-inspiring experience for stargazers.
Evaluating Accessibility and Amenities
A crucial aspect of selecting a dark sky location is accessibility. Consider the ease of reaching the site, factoring in driving distance, available parking, and any potential hazards. Ensuring a safe and convenient access route is crucial for a positive and smooth experience. Furthermore, assess the availability of amenities like restrooms, water sources, and potential lodging near the location, especially if you plan on extended observing sessions.
Understanding Local Regulations and Permits
Before finalizing your choice, it's essential to be aware of any local regulations or permits that might apply to accessing or staying in a particular dark sky location. Knowing and adhering to these rules is crucial to avoid any conflicts with landowners or local authorities. Researching and understanding the specific regulations of the chosen area beforehand is essential for a lawful and enjoyable observing experience. This includes understanding any potential restrictions on camping, vehicle access, or other activities within the area.
Post-Processing Your Images for Stunning Visuals
Optimizing Exposure for Stunning Detail
Achieving the right exposure in astrophotography is crucial for capturing the faint details of celestial objects. Overexposure washes out delicate nebulae, while underexposure leaves them shrouded in darkness. Careful consideration of your camera's settings, including ISO, aperture, and shutter speed, is paramount. Understanding the interplay between these elements is vital for maximizing the visual impact of your images. Proper exposure not only brings out the intricate beauty of celestial objects but also creates a more dynamic and captivating final image.
A crucial aspect of exposure optimization is utilizing a histogram to gauge the distribution of tones within your image. This graph visually represents the brightness levels, helping you identify areas of clipping (overexposure) or significant underexposure. By adjusting your settings accordingly, you can achieve a balanced exposure that captures the full tonal range of your subject, producing images with impressive detail and depth.
Noise Reduction Techniques
Astrophotography often involves long exposures, which can lead to increased noise in your images. This noise, appearing as speckled or grainy artifacts, can significantly detract from the visual appeal. Employing noise reduction techniques is essential to achieving clean, high-quality images. Software tools offer various noise reduction algorithms that can effectively remove these artifacts without excessively blurring the fine details of your captures.
One effective approach is to use a combination of in-camera noise reduction settings and post-processing software. Experiment with different noise reduction levels in your software to find the optimal balance between noise reduction and preservation of image detail. Remember that excessive noise reduction can lead to a loss of fine details, so finding the sweet spot is key.
Color Calibration and Enhancement
Colors in astrophotography can often appear muted or desaturated due to the low light conditions. Proper color calibration and enhancement are essential steps in post-processing to bring out the vibrant hues of celestial objects. Using tools for color balancing and adjustments can significantly improve the visual impact of your images.
Pay attention to the color temperature of your images. Adjusting the white balance can significantly impact the overall color appearance. Consider using color grading techniques to accentuate specific colors, such as enhancing the blues and purples of a nebula to bring out its ethereal beauty. However, avoid over-saturation, as this can lead to an unnatural appearance.
Improving Contrast and Detail
Enhancing contrast and detail is a fundamental aspect of astrophotography post-processing. By increasing the contrast between light and dark areas, you can draw attention to the finer details of your images, making them more visually compelling. Employing contrast enhancement tools in your post-processing software can significantly improve the overall aesthetic of your images.
Consider using techniques like sharpening to enhance fine details and bring out subtle textures in your images. Carefully evaluate the impact of these adjustments, as excessive sharpening can lead to a harsh or artificial look. Experiment to find the right balance that enhances the natural beauty of your captures without detracting from their realism.
Cropping and Composition
Cropping your images is a crucial step in post-processing, enabling you to refine the composition and focus on the most captivating elements of your astrophotography. By strategically cropping your images, you can direct the viewer's attention to specific details or celestial objects, enhancing the overall impact of your work.
Consider the rule of thirds, leading lines, and other composition guidelines when cropping your images. These guidelines can help you create a more balanced and visually appealing final image. A well-composed image draws the viewer in and tells a compelling story through its visual elements.
Adding Text and Legends
Adding text and legends to your astrophotography images can provide valuable context and information to the viewer. This can include details about the location, date, or equipment used in capturing the image. Properly incorporating these elements can significantly enhance the overall value and impact of your work.
Use a clear and concise font style that complements the image, ensuring the text doesn't detract from the image's visual appeal. Consider the placement of text carefully, ensuring it doesn't obscure important details within the image. Legends or captions should enhance the image, not overwhelm it.
Read more about Astrophotography Tips for Travelers


![How to Apply for a Tourist Visa to the USA [Step by Step]](/static/images/27/2025-06/SchedulingandAttendingYourUSVisaInterview.jpg)
![Best Road Trips in Canada [Scenic Routes]](/static/images/27/2025-07/ExploringtheCanadianRockies3AAMountainLover27sParadise.jpg)